What to do When the Toilet will not Flush Properly

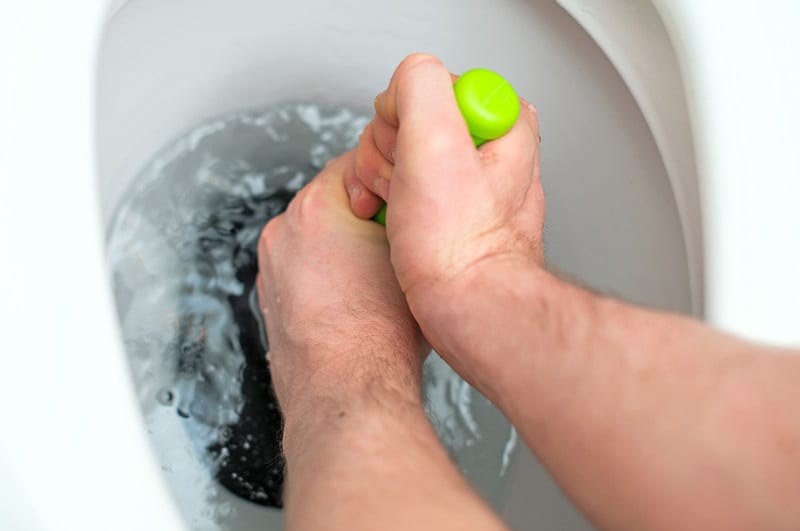
The toilet will not flush is a phrase that will be said in every home a good few times over the course of a lifetime. Trying to figure out the problem that is preventing a toilet from flushing properly can be frustrating if you don’t know what you are looking for.

The quickest and easiest way of fixing the toilet would be to call an emergency plumber out to your home but before you do that it is always a good idea to see if it is a small issue with the toilet that can be fixed by yourself. If you are unable to fix the toilet yourself you will be able to let the plumber know what you think the issue is which will save time and money for the job
Toilet will not Flush

Four Most Common Reasons When a Toilet Will Nott Flush

Here is a list of the four most common reasons when a toilet will not flush properly and how to fix them yourself. This most common of plumbing problems happen to all of us sooner or later and in the vast majority of cases can be fixed quickly and easily.

The Toilet is Blocked:

Problem:
Your toilet will become blocked if you are using too much toilet paper, or attempting to flush anything other than toilet paper down the toilet. Flushing wet wipes instead of toilet paper are said to cause up to 75% of sewer blockages a year.

Solution:

Unblocking a toilet is no easy feat! No matter how careful you are, you’ll probably spill some toilet water onto the floor when unclogging a toilet, so I would advise to put some newspaper down and to put on your marigolds rubber gloves.

If you can spot the cause of the blockage, you can first try and break up the blockage with a stick or toilet brush but if you can’t see the blockage you will need a plunger. You will need to use a toilet plunger because they are specifically designed with blocked toilets in mind.

Do not start vigorously plunging immediately because the vacuum created by the plunger could cause dirty water to spray out of the toilet. Instead, start softly, ensuring that you have created a tight seal, and only begin plunging strongly when you have forced all of the air out of the plunger.

If you are experiencing frequent blockages, then you may want to consider using a thinner type of toilet paper, particularly if you or other members of your household use a lot in one sitting.

If there is Water in the Cistern:

Problem:

You will need to check the flapper valve on the toilet syphon, this is located at the bottom of the tank. The valve opens up to allow water to empty from the cistern and flow into the toilet bowl. Pull the flapper valve up and see whether water flows from the cistern, if it does, then it is likely that your toilet is not flushing because the flapper valve arm or the lift chain connecting this arm to the flush mechanism is broken. Alternatively, the chain may be too slack and you can manually tighten this.

Solution:
Remove the lid of the toilet cistern and check to see if there is anything obstructing the float and toilet syphon. Also, check the toilet syphon for problems, check to see if the flap is still working and not deteriorated or is too warped, bent or misshapen to seal the flush tube hole. If the toilet syphon is broken, then it will need to be replaced.

The Lift Chain is not Working:

Problem:
Sometimes the lift chain, which attaches the flapper to the flushing handle on the outside of the toilet, can have too much slack and make the handle unable to raise the flapper and thus flush the toilet.

Solution:
You will only need to adjust the length of the chain to shorten it so that the chain can provide pull sufficient to raise the flapper off of the flush tube and allow water to flow when the handle is pulled.

Broken Toilet Flush Handle:

Problem:
Over time, toilet flush handles can become loose and can stop connecting with the lift chain and flapper valve. Alternatively, the handle may be too tight or may have become clogged up with limescale and debris.

Solution:
You may need to tighten the mounting nut that connects the flush handle to the toilet but if the handle is clogged up with limescale you can remove the handle and give it a good clean. Sometimes the handle or flushing mechanism in the toilet cistern are completely broken and will need to be replaced with a new one.

If you have tried this and the toilet still will not flush, then why not give us a call here at Dewar Emergency Dublin Plumbers, on 015143300 our team of plumbers is on hand to deal with any problem quickly and effectively.

How to Prevent Clogged / Blocked Drains in Your Home

Prevention is better than cure, so the saying goes, the best way to stop falling foul to a clogged or blocked drains is to be careful what you put down them.

Some of the main culprits are cooking oil, coffee granules, hair, vegetable peels and soap scum. With these running down the drain it’s only a matter of time before it turns into a blockage. Regular cleaning also has its advantages for preventing clogged or blocked drains and there are some simple methods that can also be carried out periodically.
Blocked Drains

Dewar Plumbers Simple Tips for Avoiding Blocked Drains:


Dewar Plumbers Simple Tips for Periodical Cleaning:


DIY (do it yourself) Unblocking:

Ingredients:

Method:


If you have tried this and you still cannot unblock the sink or drain the why not give us a call here at Dewar Dublin Plumbers, our team of plumbing and drain specialists are on hand to deal with any problem quickly and effectively. Call today on 01 514 3300.


How to Replace a Damaged Shower Mixer Tap

Your shower mixer tap is prone and vulnerable to wear & tear. With continuous usage every day by all members of your household or family, the internal components will wear down and lime scale will start to form within and around it. Of course, when you least expect it, just when your mother in law or Father Christmas is on their way, it will lock completely on you. Fortunately for you, it is not as daunting to replace a shower mixer tap as you may think. Like everything with the right tools and some sound plumbing skills and a great deal of patience, you will have it replaced in no time at all. If you feel you are ready to take it on here is some valuable DIY steps to completing it.

Shower Mixer Tap

How to Replace a Shower Mixer Tap


1. Firstly turn the water supply off and all valve or fixtures associated with the shower taps. Sometimes you will find these in the hot-press on either side of the hot-press. You may have a booster pump which you will need to turn off also. The last thing you need is the water to start spraying all over the bathroom and turning the house into a swimming pool.


2. Then get a flathead screwdriver. Use it to pry the decorative cap off the tap, that’s found at the center of the shower handle. Be careful here as you do not wish to scratch it as it as you may be able to reuse some of it again. Once you have removed this cap, you will then discover a screw that secures the mixer handle to the wall.


3. This screw must also be removed. Get a Phillips screwdriver and use that to loosen the screw, be careful not to damage the threads as this would lead to a much bigger job. Make sure that you turn it counter clockwise to loosen it up. When you have done this, you should be able to pull the handle off easily. If it won’t budge at all, use some penetrating oil like WD40 or warm up the mixer handle with a hair dryer. You may also use a handle puller that’s available from most good plumbing suppliers.


4. If you have a two handle style shower mixer tap then carry out the same process on the other side also.


5. Afterward, get the flathead screwdriver again and slide it at the back of the escutcheons. These escutcheons are the ones that cover the hole where the mounts of the faucet handles are located at the back of the mixer, pry the escutcheons off the concrete wall gently so as not damage the tiles or wall.


6. When you’ve removed them, you’ll find the retaining nuts. Get a wrench and loosen the nuts up. Detach them afterward. Then, get a pair of slip-jaw pliers and grip the post of the mixer. Hold it tight and carefully pull the post out of the assembly.


7. Once done, get a new shower mixer tap post and insert it into the space where you removed the old one from. Then start to thread slowly the new retaining nut and use your adjustable wrench to tighten it. Again, do the same thing with the other handle if your shower mixer has two handles. Remember be very careful tightening up as you could over tighten and cause a leak.


8. Install the new escutcheons properly. Follow up with the new mixer handles. Make sure that you tighten these screws to secure them to their mounts correctly. Usually, you will use a Phillips head screwdriver for this task. Install the new decorative caps in place to cover the screws, they usually clip or snap on.


9. Lastly, turn on the water supply slowly just in case you have any leaks, Inspect for any leaks around the walls or pipework if all is ok turn water pressure up and turn back on the booster pump if one is fitted.


We hope that this blog has helped you in some way. If however you wish to leave the shower repairs to DeWAR emergency Dublin plumbers please give us a call and we would be happy to carry out any shower repairs, bathroom remodeling, blocked toilets, sinks and all general plumbing repairs for you call us 24 hours a day on  01 514 3300 to schedule a service for you.

Irish Families Facing €5k Repair Bill to Remove Lead Pipes from Homes

A Government strategy to deal with lead contamination in the water supply of up to 200,000 Irish households is expected to be agreed at today’s Cabinet meeting.

Some 200,000 homes – as well as schools, hospitals, prisons and nursing homes – are suffering from lead contamination from lead pipes.

water

The alarming figures prompted a senior HSE official to warn women against bottle feeding their children.

It may take decades to remove dangerous lead water pipes from Irish homes, Environment Minister Alan Kelly has said.

Environment Minister Alan Kelly is now seeking to roll out a grant scheme by September aimed at providing financial assistance to low-income households with lead plumbing.

The grants will be closely modeled on the septic tank remediation scheme and will allow households with incomes up to €50,000 to receive 80pc of the costs back, up to a maximum of €4,000.

There will be a separate band in place for those earning €50,001-€75,000, who can claim up to 50pc of the costs back, up to a maximum of €2,500.

Tax relief for projects involving lead removal will also be available through the Home Renovation Scheme.

But Mr. Kelly admitted that the Government could not say how many of the 200,000 families affected will qualify for the grant scheme.

Families who are not deemed to be living on low incomes face bills in the region of €5,000 and even higher in some cases where lead levels are greater.

Householders can check to see if they are affected by scraping pipes with a coin and if a silver strip is revealed, it is lead.

Fianna Fáil TD Barry Cowen said the situation continued the “farce” of Irish Water.

“The ‘First Fix’ policy was a central part of the Government’s roll out of water charges. Homeowners were assured that the first fix on their pipes would be provided free of charge. Up to 200,000 homeowners with dangerous lead pipes will find themselves digging deep into their own pockets to pay twice over to ensure they have access to a safe and secure water supply.”
Mr. Kelly insisted he wanted to deal with problem “head on” as it had been neglected in the past.

The environment minister insisted that the scale of the problem would not have been detected without the creation of Irish Water.

The Irish Water survey found some homes in Dublin had lead levels 80 times the recommended limit.

Call today on 01 514 3300.